How To Use a Walking Foot
Nicki LaFoille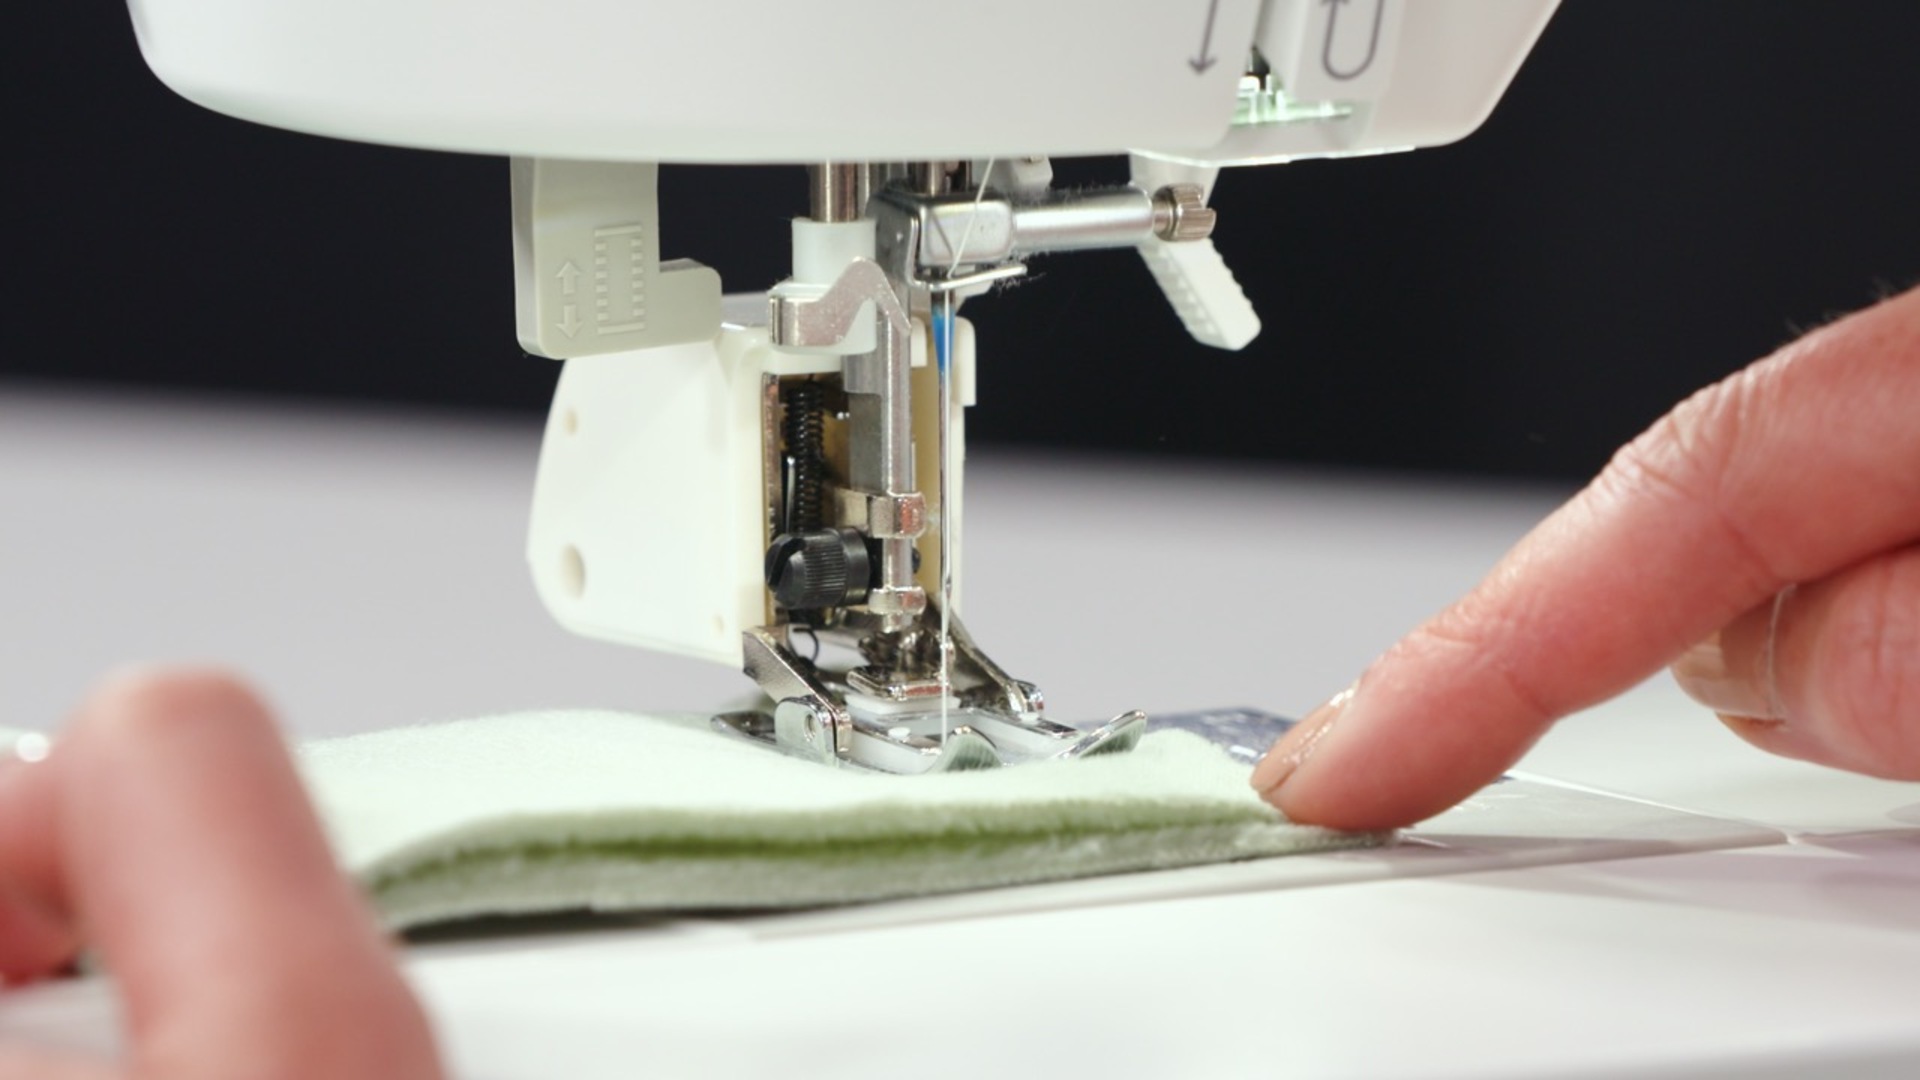
Video Player is loading.
Learn how to install and use a walking foot for quilting a quilt sandwich, or for sewing any fabrics that tend to shift and creep. Nicki LaFoille discusses the benefits of using a walking foot, and demonstrates how to attach it onto the sewing machine.
Knowing how to use a walking foot is useful knowledge to have in your sewing tool kit.The walking foot is designed to feed the upper layer of fabric through under the presser foot at the same rate as the lower layer. The walking foot is popular with quilters when machine quilting a quilt sandwich, but it is useful for all types of sewists, especially when working with particular fabrics, such as satin or some knits with a shiny face. Fabrics with a nap, such as Minky, faux fur, velvet, corduroy, etc, are prone to shifting and creeping, especially when sewn with right sides together, and can benefit from using a walking foot.
For more tips and tricks on taming slippery fabrics, check out this video: Tips for Sewing Slippery Fabric
Nicki discusses how the walking foot works, with a set of feed dogs on the underside of the presser foot, and demonstrates how to attach the walking foot to the sewing machine correctly. Some walking foot attachments may look slightly different, but the same basic attachment and functionality applies.
If the fabric you are sewing starts to feed unevenly under the presser foot, try using a walking foot to alleviate the problem.
For more on other specialty presser feet, check out these resources:
How to Use a Rolled Hem Foot
A Guide to Sewing Machine Feet
A walking foot is a really useful tool to know how to use. It's designed to feed the upper layer of fabric through under the presser foot at the same rate as the lower layer of fabric feeds through. Often times, quilters will use the walking foot when they have their quilt sandwich because they'll have the two layers of fabric with that lofty layer of batting in between. And they want all the layers to feed through evenly at the same rate. So sometimes you'll find when you're sewing something, the the layers will shift, especially if you're sewing on fabric that it has a shiny face or slippery face like satin or some um some knits like uh dance wear or swimwear will have that shiny face that'll be really slippery when you get the right sides together or something that has a nap like uh a minky or a faux fur or velvet corduroy.
Something that when you get the right sides together will shift around a lot, you might find that you start sewing and the start of the seam, the layers are even. But then when you get to the end of the seam, the layers may have shifted. And at the end of the seam, the layers are no longer even and that's called creeping. And that happens because the lower layer of fabric, the layer that is against the bed of the machine has the benefit of those feed dogs touching the fabric and the feed dogs with every stitch, the feed dogs are pulling on that fabric to feed it through. Whereas the upper layer of fabric doesn't have anything.
So it oftentimes will get left behind. So that is where the walking foot comes into play. There are a lot of things that you can do to combat that creeping and the walking foot is one of the most useful. And this apparatus might look a little bit weird and intimidating. But once you learn how to attach it and how to use it, it's really easy.
So on the underside of this foot, we have it, it's sort of open so that the feed dogs will, they can sort of jump up and down in a up and down and sort of backward motion to pull that fabric that's touching the under layer of uh touching the underside of the presser foot, pull that along under the foot and feed it along at the same rate as the lower layer. And this bar up here sits on top of the, the needle bar, the uh the screw that holds your needle in place under here. So that with every motion of the needle as the needle goes up and down, the bar that sits on top of here will move up and down. And those feed dogs will move and help that upper layer of fabric along. So this is um a walking foot that uh came along with my machine.
And here's another walking foot that was sort of a generic type walking foot. So it looks a little bit different up here. But this the, the purpose and the functionality of it is the same except instead of just sitting on this lever sitting on top of the needle bar with this one, the um that screw on the needle bar kind of slides in between this fork. So it's really easy to attach. You'll need to remove the presser foot holder.
So you might need a screwdriver to get this screw started. We're going to remove this and then the walking foot, we'll come over and hook on to you that presser foot bar and then the lever on top of the walking foot sits on top of this needle bar. So we're going to put the screw back in. So once that screw is tightened down, can slide your fabric underneath and with every motion of the needle that lever goes up and down, which moves those feed dogs on the bottom of the presser foot. So it's feeding our fabric along at the same rate.
So your layers of fabric will stay together no matter how slippery they are and how much they want to creep. It really helps those layers stay together. So there are a ton of different uses and different scenarios where you might need a tool to help your layers stay together. And the walking foot is a great tool to know how to use.
Share tips, start a discussion or ask other students a question. If you have a question for an expert, please click here.
Already a member? Sign in
No Responses to “How To Use a Walking Foot”