Woven Windowpane Fabric
Nicki LaFoille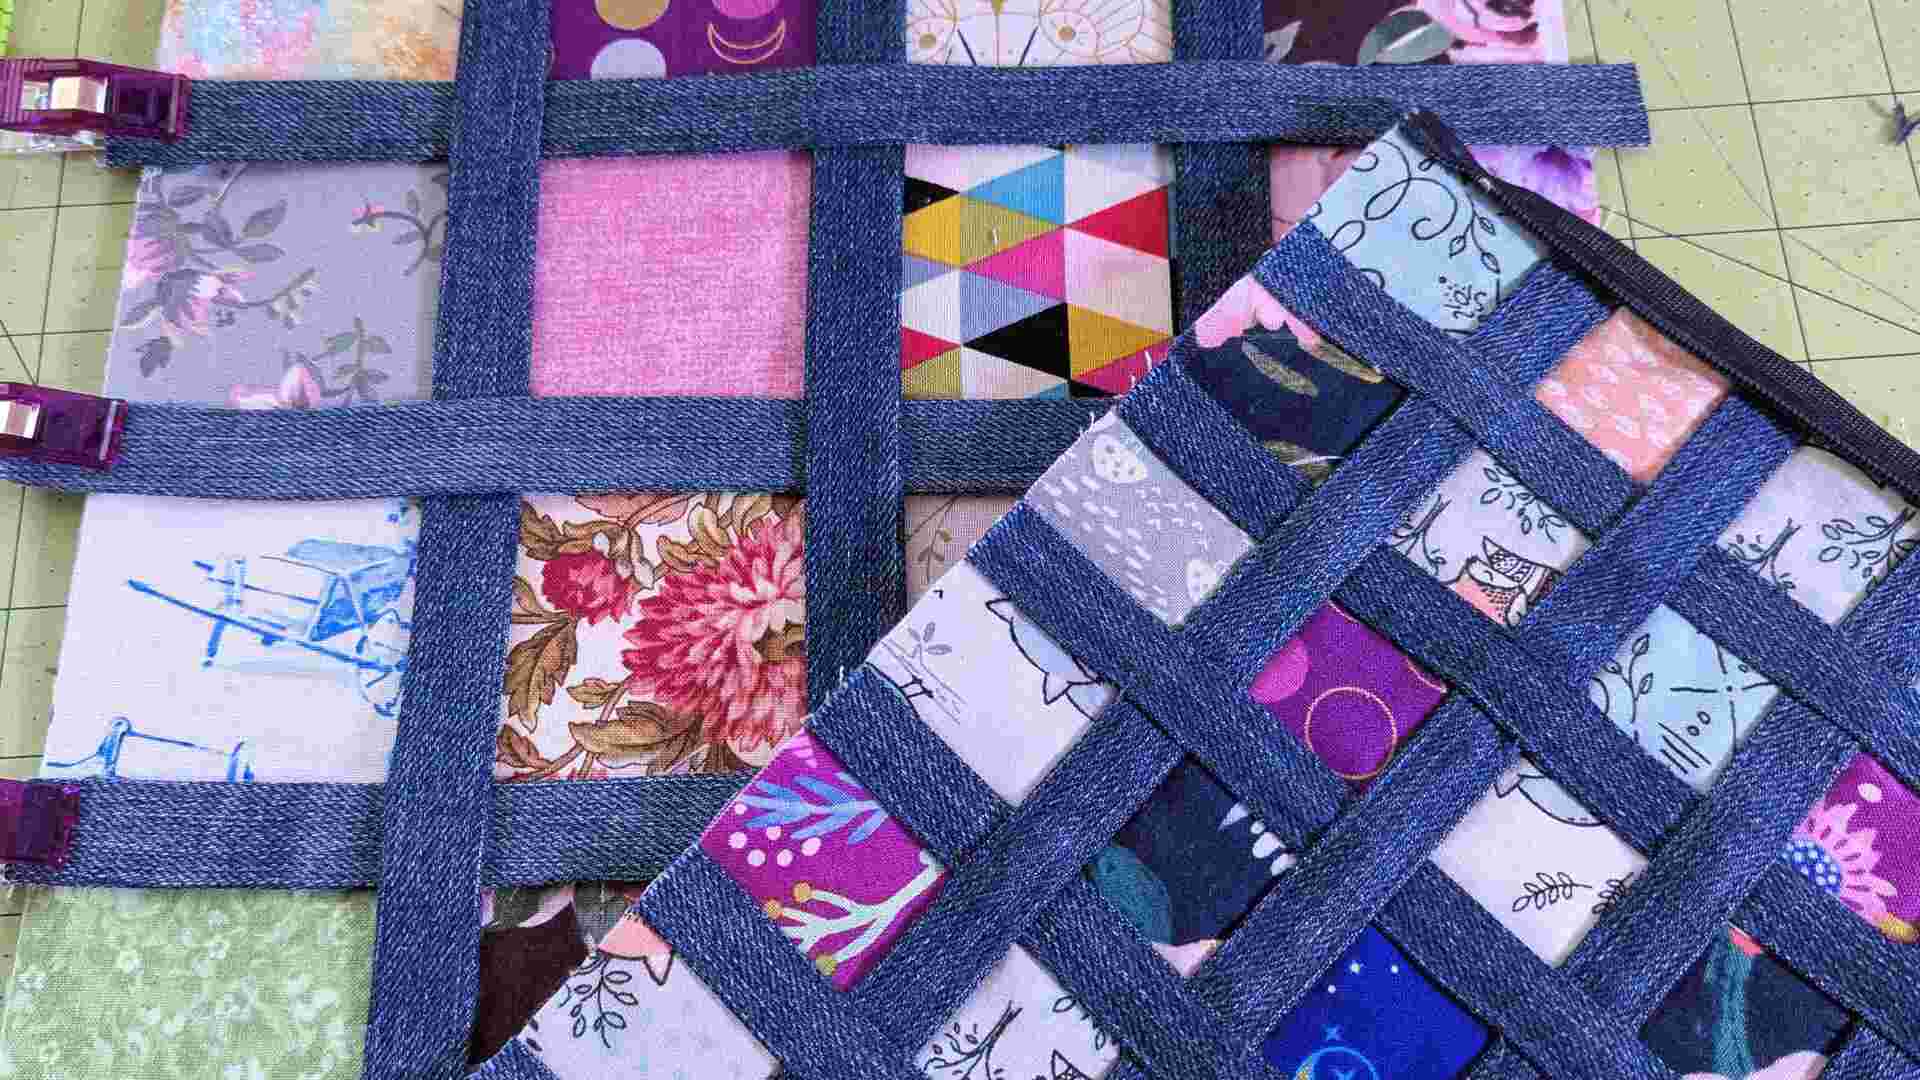
Video Player is loading.
Join us for a hands-on workshop with Nicki LaFoille where you’ll learn how to create a stunning, one-of-a-kind fabric embellishment using fabric scraps and binding. This session will guide you through the process of crafting a beautiful woven patchwork effect, transforming leftover materials into a unique piece of art. Click here to download.

Hey everyone, thank you so much for joining me. My name is Nikki Lafoyle, and in this video I'm going to show you how to achieve this fabric embellishment technique which I've been calling the woven window pane because it looks kind of like a window pane with these little. Different squares of fabric and our binding strips kind of framing it in and they're woven together so you get some depth and dimension and it's a really interesting effect and bonus that you can use up a lot of these little fabric scraps. So there is a PDF available for you to download. It's just a sort of a guideline, um, the steps for this technique all bulleted out for you, so you can find that link to download that PDF in the comments.
And of course, I'm going to be going through everything with you in this video. And if you're watching live and if you have any questions feel free to type those into the comment section and I'll see those, get any questions answered for you, and feel free to just comment on um what you might use some of these woven window pane panels to make um just say hi, where you're watching from, get a conversation going. I'd love to hear from you. So in that download that you um can click to uh to download there's a supplies list and the supplies are really there's not a lot for this and I called it a fabric embellishment technique, but we're really kind of creating a fabric panel from nothing, from scraps, but we do need a a base material to build this on. So I like to use a fusible interfacing for this, and you can use kind of whatever you have, um.
It depends a little bit on what you're going to be using this panel for. So, uh, I like to use these to make bags, you know, a little, this is one that I'm in the process of making into a little zippered pouch. And I really like fusible fleece for that. So fusible fleece, a lightweight interfacing, that's what I've used on this panel here. And if you don't know what you're going to be using this panel for a lightweight interfacing is a really good place to start because you can always add interfacing to it um if you decide you want something a little bit more stable.
Um, so you'll need some lightweight interfacing or other fusible material. You could also, um, feasibly use, um, something that's not fusible and do like a temporary spray adhesive or use a glue stick or something like that to stick your pieces down onto it, um, if you're a little scared of using the fusible with your iron in the way that I'm going to show you how I use it. So, um, material to build on, you'll need fabric scraps. So you get to dive into your stash of scraps and use up all these little pieces that you've been saving because you didn't know what you might need it for this is what you needed it for so. Um, Grab those little fabric scraps and I like to use a lot of different colors um because with the way these binding strips kind of break up the squares.
You can put these different colors and patterns next to each other, and it's not like clashing because you have something separating them. You could of course use a little bit more of a monochromatic scheme if if you wanted to. You are the master of your own destiny, as they say, anything you want. Whatever fabric scraps you have, um, you'll also need some material for these binding strips. I like to use denim for this um I think it gives a really cool texture and because of the thickness of denim, it gives a little bit of depth as well um but of course you could use whatever you have cotton.
I'm sure that would look really nice as well. Um, and the size that you cut these pieces and these strips, it also depends on. How you want it to look. So there's a a big difference between my 2.5 inch squares and my 5/8 inch finished binding, and these 1.5 inch squares and. My half inch binding strips.
So it is totally up to you. This is your project, um, however you want it to look. I wanted to make a couple of different sizes so you could see really how that changes the look of it. So if you're making a smaller project like my little zippered pouch, a smaller. Square and window pane looks really nice, larger project, a little bit bigger looks really nice, but it's totally up to you.
Um, Lisa says, I think this would make a super cute throw pillow. I agree, this is uh a great home deck type panel. Um, Jessie is watching from New New Brunswick, Canada. Thank you so much for tuning in. We have Wanda from North Carolina and Yvonne from Michigan.
I'm also from Michigan. Hello, Yvonne, fellow Michigander. So, to start with, um, I like to start by cutting my fusible panel. Roughly the size of the project that I'm going to be making. And the great thing about this is if you don't really know the size that you're going to be making a project from, you can start and then you can also kind of add on panels because we're using a fusible you can kind of add it to the edges and keep making it bigger.
Um, so I've cut my fusible piece. Roughly to the size, I think I want it and here's my. My feasible fleece, like I said, there's some loft to it, um, but it offers a lot of stability and structure while remaining nice and soft. So, you want to cut your squares, these are 2 1/2 inch squares, and arrange them on your fusible. So I've got the fusible side up.
Which can be a little nerve-wracking because we're going to be pressing on this side, but you want to arrange your fabric squares so that the raw edges are touching. So in theory, there is no fusible. That is showing to get on your iron. But if that makes you nervous, you can also Use a piece of parchment paper. To press on.
So that no glue will get on your iron. That is no joke. Nobody wants that. So arrange your fabric pieces and I just wanna make sure my raw edges. Are touching And I've aligned the edges of the fabric with the edges of the fusible on the sides as well, as much as I could.
There's a little bit. Um, my fabric is hanging off the fusible a little bit on the short ends, which is fine. That just means that. My fusible won't be so much in my seam allowances when I stitch this into something, and that's fine with me. So I'm gonna finish off.
arranging my squares. And then we will press this to fuse everything. Sandra from Austria, thank you so much for tuning in from Austria. I can see that panel with the smaller pieces turned into a small purse, absolutely. I think it creates such a cool like visual interest.
And you can use all of those beautiful fabrics that you've been collecting. That say, you know, kind of. Or an expression of your personality. OK. So, there is my fabric panel, double checking.
There's no fusible. That looks good to me. So we're going to press this, and when you're pressing on your fusible always, You wanna use a pressing motion, not an ironing motion, and especially with this because it would be so easy for the edges, any of these edges of these little squares to come up. So we're pressing up and down motion. Press down and then lift.
And you want to press for, follow your manufacturer's instructions for whatever feasible you're using. But I like to press for about 10 seconds in each spot. Using a little bit of steam and a hot iron. And over at the edge here, I've got a little bit of fusible showing, so I'm just gonna be careful. Not to get Not to press over that and get any glue on my iron.
You will also need for this project. A glue stick or some double sided tape, something to stick down your binding strips over these seams. Before we go to sew it, that is super, super helpful for keeping everything in place. If you're using a lighter weight fabric like a cotton, um, you might be able to pin it down, but I'm using denim so I didn't want to have the hassle of trying to pin those layers of denim down through my fusible. So I like to use a glue stick.
And it holds everything down really nicely. Holds everything in place so you don't even have to worry about it. All right. That feels like it is good infused. All right.
Next, We are going to align our binding strips. Over these raw edges, so you'll need as many binding strips as you have seams for your rows and your columns. So here are. My denim binding strips that I just cut from an old pair of jeans. So I cut my strips at 1 1/4 inches wide.
And I pressed. The raw edges in to meet at the center. So they finish at 5/8 inch wide. I didn't want to take up too much of. The The fabric, I mean, the fabric, it's the focal point.
I didn't want the binding strips to be too wide. I wanted to let that fabric shine. So we're going to start. I like to clip these at the upper edge. So I'm starting and I'm centering my binding strips over my seams.
In both directions. And then we're going to start weaving this together as we glue these down. Hi from the UK from Jam Pots Misty. I'm really curious about how you will sew down the binding strips, which there be will there be hundreds of ends to tie off. Yes, there'll be lots of ends.
And I'm lucky my sewing machine, it has um. Automatic Um, tie off button and thread cutter. So because of the way we are going to be stitching this, yes, because we're going to be stopping a lot and jumping over the where our woven strips are woven under. So, I'll show you how that goes. So I'm just gluing a little bit at a time here.
Because my glue actually dries fairly quickly. So like one seam at a time or one square at a time. And we want to go over and under. So I went over on that one, so I'm going to go under on this one. And we'll go over on this one.
And this glue is just a glue stick of Elmer's washable school glue, but it comes in really handy for a lot of sewing. Aspects So this one's going to go over. That piece. And then because we had our strip going over on that one, we're going to go under. On this one, and in your PDF that you have downloaded, hopefully, there are some in progress pictures as well, just to kind of.
Keep you oriented for how we're weaving this. Wanda says, wonder how it would look to let the denim edge fray. That is an excellent idea. Yeah, that would be a totally different look, a little bit more organic. I like that idea.
OK, so we're going over on this one and under on this one. And then over on this one. And before you go to sew this on the machine. Double check that you have your weave. All correct, because it's not, even with this glue stick, it is not whoops, and see.
I almost did it myself, go under for that one. It's not permanent with this glue stick. It's not permanent until you go to sew it down. So double check that everything is in the correct arrangement. We know under And over.
A couple more seas. And then we will take this to the machine and stitch. And the color of thread that you use. When you stitch these edges down, also can add. A decorative effect.
So on my my small one that I did. I used Blue thread so that it would blend in. On this one, I'm going to use a brighter thread. I want to use a gray so that you can see the stitching. And we'll see how we like that effect.
And I'm just going to use a straight stitch when I go to stitch this. You could use A different stitch. You could use a decorative stitch. Sky's the limit. Oops.
Under Luckily this glue dries clear. And you do wanna make sure you wait until your glue is dry. Before you go to stitch this, stitching through wet glue be bad for your needle. OK. So everything is stitched down.
I wanna move this a little bit. It looked like it was not quite centered where I wanted it. Yeah, that's better. OK. Make sure I don't have any questions coming in.
OK. So when we go to stitch this, Like I say in the instructions, we're going to stitch the edge of this, and where the strip is woven under, you want to skip over. So this Uh, side to side strip is going over this vertical strip. So when I stitch this, I'm going to stop here, cut my thread, jump over that, and then stitch again. And where this vertical strip is going over, I'm going to keep stitching and then stop, and so forth, skip and then jump.
So that we are reinforcing this woven look. So I'm gonna bring this over to my machine. And I'm going to start, and I'm edge stitching, so I'm going just. A scant 1/8 of an inch away from my edge. And I'm coming up to the edge of my neck strip.
Now you can. Um, back stitch a little bit, lock your thread in some way. And I'm actually going to cut my thread because I have an automatic thread cutter. If you don't, you could just lift your needle, lift your press or foot, and just kind of move over and skip that and then cut your threads after. OK, and I'm locking that stitch again.
And then this is an over section, so we are continuing over. And we're reaching another under section, so lock. And I won't cut that one. I'll just kind of skip over so you can see, it's easy to tie or to cut those threads off after. Locking the start of the next stitch, and then we carry on.
So we're going to do this for our over strips, or for our vertical strips. And our horizontal strips. And if you don't have a lock stitch button, you can just do a back stitch or two. So I'll do that for a couple of them. And then at the end of the panel.
You will cut that and bring that over. So we've got our. Stitching On one of our long strips. So I'm going to clip those. Where I skipped over.
Um, Jam Pots Misty asks, would it work if you didn't use the glue? It would, it would work. The glue is just to hold these binding strips down as you are sewing it. Um, you could use pins to hold it in place or if you were that type of person, you could just trust yourself and um kind of hold these in place. You could even clip at the um other edges to try and hold those in place.
Um, centered over your seams as you're stitching. I'm the kind of person I like to have everything locked down as it's going under the needle. So it's up to you. But you can see, hopefully you can see my my gray thread, so we skipped over this one, and then stitched, skipped over that one, and then stitched. So I'm going to do.
One of my sideways ones. And then we'll jump to one that is. Already a little bit more done, so you can see the finished effect. So you do have to kind of pay attention. As you're sewing, so you don't accidentally sew over one of your.
woven under spots. You could also um. You could patchwork a panel together if you wanted. And that would kind of Eliminate the need for a feasible behind it if you, you know, secured all of your little pieces together with seams first. But I didn't want to do that because it just seemed like the seams were all going to add a little bit more bulk um under my binding strips, and I knew I wanted to use denim.
So I wanted to eliminate as much of that as I could. So again, we skipped over our over spot. So I'm gonna stitch the other side of this horizontal one, actually. And then we will jump to our finished panel. And I have um up to my stitch length a little bit.
So my machine defaults to 2.4 for construction, blank stitches, and I've bumped it up to a 2.8. Um, which I usually use for top stitching. 2.8, you could go up to a 3. And I like doing that because. The stitch is a little more visible.
Oh, I ran out of bob and thread. I've been sewing with air. But you can see the idea. And let's jump to this one. So, I've got.
My stitches going. And securing this binding strip down and just hopping over wherever something has crossed over it. So when you're finished, um, sewing all of your your vertical and your horizontal strips, you can trim those off of the sides. Trim the extra binding. Off at the edges.
I'm a little extra fusible showing on this one, so I'm gonna trim that off. And then you can use your panel. To create whatever you want, whether that is a little purse, a little zippered pouch, like I'm going to do with this one eventually. Um, tote bag. What have you.
Honestly, um, this is such a cool little panel you could even, you know, use it as um. Just one little square of it in the center of something and use some plain fabric around it. Uh, use it as, you know, a patch pocket on something. So It is just a cool looking technique. I love the depth that this woven, um, the woven technique gives to it.
And again, you can use it for your scraps, so what's better than that? So, uh, Sandy says I think the stitches would also look good in a classic yellow thread, like some denim jeans are made, yeah, like a a goldie type yellow for that top stitching they use on the flat fell seams on the sides of jeans. That's a great idea. That would look great. A nice little pop of color.
I started doing this one in like an orange down here. It's really hard to see. So that's why I switched um to the gray, which would be a little bit lighter, a little bit more of a pop. And again, This one was stitched in a like a blue denim color thread, so you can't even see the stitching on that one. You just see the binding strips.
So, a little bit of a different look, but Um, a really fun panel that you wind up with to then use in your creative projects. So thank you so much for tuning in and watching, um, the video. I hope you enjoyed it. I hope you enjoy this technique and uh make yourself a woven window pane panel to use in a creative project in the future. Thanks again and have a great day.
Bye.
Share tips, start a discussion or ask other students a question. If you have a question for an expert, please click here.
Already a member? Sign in
No Responses to “Woven Windowpane Fabric”